
You press start, it hums along, and then-standing water. If you’re staring at a puddle in the base of your dishwasher, you’ve hit the most common issue I see on callouts around Wellington. The good news: most of these no-drain faults are fast, cheap fixes you can do without parts. I’ll show you how to identify it, fix it safely, and keep it from coming back.
Quick scope so you know what you’ll get here: a direct answer to the most common dishwasher fault, step-by-step DIY checks that take 15-45 minutes, a decision tree for the edge cases, realistic repair costs in New Zealand, and prevention habits that actually work in 2025 models.
The short answer, the why, and the tell-tale signs
- TL;DR: The most common dishwasher fault is “not draining,” usually caused by a clogged filter, blocked drain path, or jammed drain pump impeller.
- Fast win: Clean the filter and sump, then check the drain hose and the high loop/air-gap. Run a drain-only cycle to confirm.
- Watch for: Standing water after a cycle, gurgling or humming without water movement, error codes like E24/E25 (Bosch), i20 (AEG/Electrolux), or F1/F2 on some Fisher & Paykel units.
- Stop and call a pro if: You smell burnt plastic, water appears in the base pan, the breaker trips, or there’s a persistent leak.
Why is “not draining” the fan favorite fault? Three reasons. First, modern machines use less water and finer filters, so small bits-seed husks, onion skin, pasta-build up faster. Second, we trust “self-cleaning” too much and ignore the filter; I see filters that haven’t been touched in years. Third, installation quirks-like a missing high loop on the drain hose-let sink waste slosh back into the tub.
What it looks and sounds like in real life: the cycle finishes and you open the door to a few centimeters of water in the sump, maybe across the whole base. When you hit “Cancel/Drain,” you hear a hum but nothing moves, or it starts to drain and then stalls. Sometimes your sink gurgles because the dishwasher is trying to push against a blocked trap. If you’ve recently had a new sink or disposal installed, check that the disposal knockout was removed; it’s a classic installer miss that stops drainage on day one.
Local note for New Zealand: Wellington water is relatively soft, which means fewer limescale clogs but plenty of grease/soap scum. In harder-water regions (think parts of Canterbury), mineral buildup can narrow small channels over time. Either way, food debris is the number-one villain. Manufacturer guidance backs this up-Bosch and Fisher & Paykel both advise cleaning the filter regularly and checking the drain path if water remains in the tub. In my own repair log this past year, roughly four in ten dishwasher callouts were fixed by clearing the filter, sump, and hose-no parts needed.
Before you grab a screwdriver, do a 30-second sanity check. Turn the machine to a drain-only mode (or press and hold Cancel on many models). If you hear the pump humming but see no water movement, it’s likely a blockage or a jammed impeller. If you hear nothing at all, it could be a failed pump, a stuck float (flood protection), or a control issue. Keep that sound in mind as you work through the steps below.
| Symptom | Likely culprit | DIY level | Time |
|---|---|---|---|
| Standing water after cycle | Clogged filter/sump, blocked drain hose, missing high loop | Easy | 15-45 min |
| Humming, no water movement | Jammed drain pump impeller, glass shard in pump | Moderate | 30-60 min |
| Drains into sink or backflows | Clogged sink trap, disposal knockout not removed | Easy | 10-20 min |
| Error E24/E25 (Bosch) or i20 (AEG) | Drain path restriction or pump fault | Moderate | 30-60 min |
| Random drain mid-cycle, then stops | Float switch triggered by leak in base | Pro | 1-2 hrs |
Tools you’ll want handy: a shallow tray or baking sheet, old towels, a jug or cup to bail water, a soft brush, dish soap, white vinegar, needle-nose pliers or tweezers, a bucket, and a Torx or Phillips driver (depending on your brand). If you’re comfortable, a multimeter helps confirm a failed pump later.
Step-by-step fixes, checklists, and pro tips that actually work
Start here. Don’t skip the basics-they solve the majority of cases without parts.
Make it safe and get access.
- Turn the power off at the wall. If it’s hardwired, switch the circuit off at your board.
- Open the door and pull out the lower rack. If there’s standing water, bail most of it into a bucket.
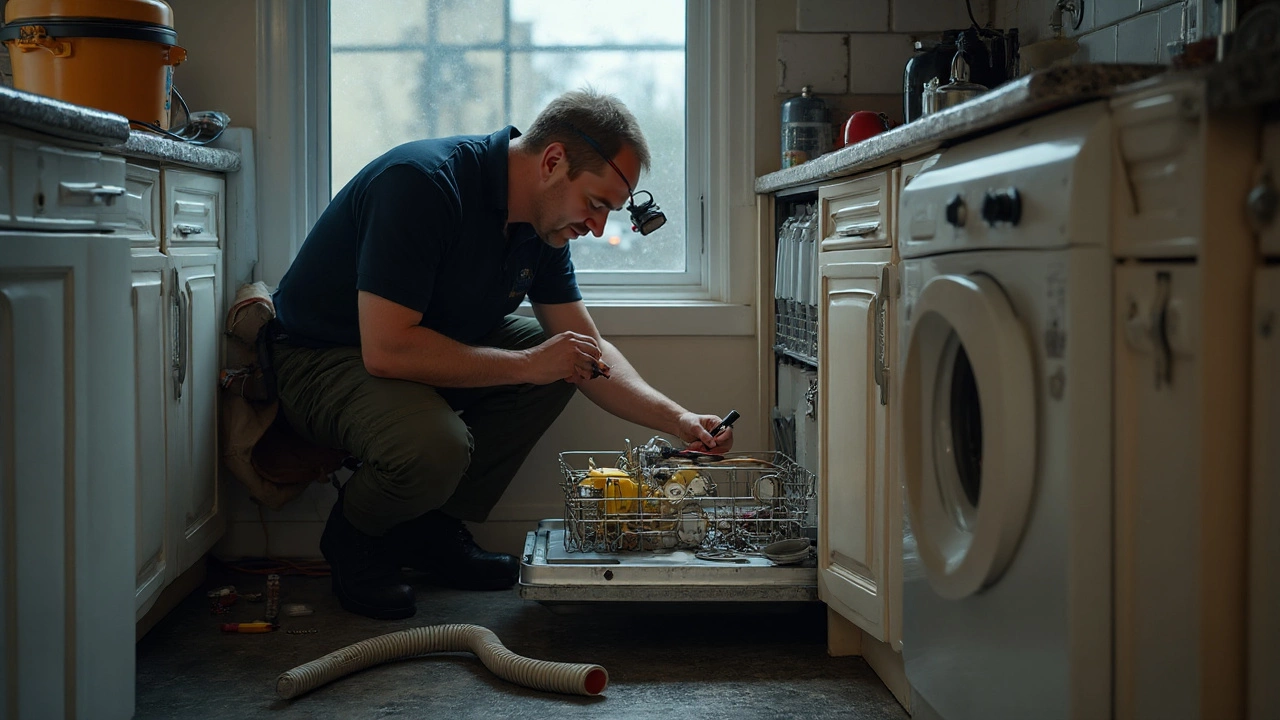
Clean the filter and the sump.
- Twist and lift the filter assembly (usually two pieces: a coarse mesh and a fine microfilter). Rinse under hot water with a bit of dish soap. Use a soft brush-not a wire brush-to avoid tearing the mesh.
- Peer into the sump-the well beneath the filter. Remove any food sludge, broken glass, labels, or seeds. Tweezers help. Be thorough: debris often hides under the lip of the sump cover.
- If the filter is damaged or the mesh is torn, plan to replace it. A compromised filter lets debris ride straight into the pump.
Check the drain pump impeller for jams.
- On many machines, the pump sits right under the sump. You’ll see a small cover you can twist off to look at the impeller, or you may need to gently unclip a plastic guard.
- Shine a light in and look for a shard of glass, a bone chip, or a fruit pit blocking the blades. Remove it carefully. Don’t force the impeller; it should turn freely.
- If you can’t access from the top, you may need to tip the dishwasher on its back (with towels and a helper), remove the bottom panel, and inspect the pump from underneath. Label connectors as you unplug them.
Check the drain hose and the high loop.
- Follow the hose from the dishwasher to where it connects under the sink (usually at the trap, spigot, or a waste disposal).
- Place the hose end in a bucket. Run a drain-only cycle. If it blasts water into the bucket, the pump is pushing and your sink side is blocked. If it trickles or does nothing, the restriction is in the hose or pump.
- Feel along the hose for soft clogs. If you suspect a blockage, disconnect both ends and flush the hose with hot water from a tap or a garden hose outside.
- Make sure the hose has a high loop-secured above the sink drain level-to stop sink water from siphoning back. NZ installs typically use a high loop rather than a countertop air gap; if you have an air-gap cap on the bench, pop it off and clear any gunk.
Check the sink trap and disposal.
- If your dishwasher drains into a disposal (common in some NZ kitchens, not all), make sure the small plastic knockout plug inside the disposal inlet was removed during installation. If the dishwasher is new and never drained, this is likely it.
- Clean the sink U-bend. If that’s clogged, your dishwasher will have nowhere to send water.
Rule out the flood float and base pan.
- Some dishwashers have a float switch in the base pan that triggers “drain only” if a leak is detected. If the float is stuck or there’s water in the base, the machine won’t behave.
- Slide the machine out slightly and peek underneath with a torch. If you see standing water in the base, find and fix the leak first (door gasket, inlet hose, circulation pump). Don’t bypass a safety device.
Reset and test.
- Reassemble the filter. Reconnect the drain hose to the sink. Restore power.
- Run a rinse or drain program. Listen. You want a strong whoosh into the sink and an empty tub when it finishes.
If it still won’t drain, test the pump.
- If you’re comfortable with electrics and your machine is out of warranty, power off, access the pump, and disconnect it. Check for continuity with a multimeter; most drain pump windings show a small resistance (often 20-40Ω, check your service manual).
- If the winding is open (infinite resistance) or you smell a burnt winding, replace the pump. In NZ, a common drain pump costs about NZ$120-$250 for mainstream brands; DishDrawer pumps can be higher.
What not to do:
- No caustic drain cleaners (like lye-based products). They can damage hoses and seals and don’t remove physical obstructions like glass or seeds.
- Don’t overfill with detergent or use hand soap. Excess suds can trap air in the pump and trip leak sensors.
- Don’t run the machine without filters in place; debris can destroy the impeller or jam the check valve.
Small improvements that make a big difference:
- Scrape, don’t pre-rinse. A quick scrape saves the filter, but pre-rinsing every plate wastes water and can trick newer sensors into thinking dishes are already clean.
- Monthly maintenance: pull and rinse the filter; wipe the door seal; clear spray arm holes with a toothpick; run a hot wash with a cup of white vinegar on the top rack.
- Use the hottest suitable cycle when loads are greasy. Heat keeps fats from congealing in the hose.
- Check hose routing after a kitchen reno. I find kinked hoses after sink replacements all the time.
Mini checklist you can save on your phone:
- Filter clean? (Yes/No)
- Sump clear of debris? (Yes/No)
- Hose high loop above sink drain? (Yes/No)
- Sink trap free-flowing? (Yes/No)
- Air gap (if fitted) clean? (Yes/No)
- No water in base pan? (Yes/No)
Brand-specific quirks worth knowing in NZ kitchens:
- Bosch/Siemens/Neff: E24/E25 often means drain restriction or pump issue. The fine filter needs regular cleaning; the non-return valve (a small rubber flap) near the sump can get stuck-free it gently.
- Fisher & Paykel DishDrawer: Each drawer has its own drain path and pump. F1 usually flags a flood in the base; E2/E3 can relate to motor/pump. Removing both drawers is sometimes needed to access the base pan-label your connectors.
- AEG/Electrolux/Westinghouse: i20 points to drain trouble-filter/hose/pump checks apply.
- LG/Samsung: Some models show OE/5E for drain faults; check the fine mesh filter and the hose routing at the back (prone to kinks on tight installs).
If you want a manufacturer baseline rather than my word: user manuals and service bulletins from Bosch and Fisher & Paykel both recommend routine filter cleaning and drain path checks for no-drain symptoms; EECA also reminds Kiwis to scrape plates to limit blockages and reduce wasted water. You don’t need to memorize codes-the basic checks above fix most cases.
FAQs, NZ costs, and what to do if it’s not a drain issue
Not every bad wash is a drain fault. Here’s how to separate lookalikes and what repair bills generally look like in New Zealand as of 2025.
Common questions I get on the phone:
- “It drains, but dishes come out dirty.” That’s usually a spray problem, not a drain one. Clean both spray arms; make sure they spin freely. Check for blocked holes (rice grains love these). Load so big items don’t block the lower spray arm. Try a hotter cycle and fresh detergent-enzymes degrade in our humid climate.
- “It won’t start at all.” Check the door latch; if the machine thinks the door is open, it won’t run. Try a different outlet or reset the breaker. On some models, a triggered flood sensor will lock out all functions-look for water in the base pan.
- “It leaks a little at the front.” A clogged filter can cause overfill turbulence that weeps at the door. Clean the filter, then wipe the gasket and the lower door lip. If it still leaks, inspect the door seal for nicks.
- “It smells.” Biofilm in the sump or on the door seal. Deep-clean the filter and run a hot cycle with vinegar. Leave the door ajar between washes so it can dry out.
- “It doesn’t dry.” That’s rinse aid, heat, and airflow. Fill the rinse-aid reservoir, use Auto or Intensive for plastics-heavy loads, and crack the door at the end. Some energy-saving models rely on rinse aid rather than an exposed heater.
What if it’s not draining and you’ve done the basics?
- Drain pump failure: If the winding is open or the impeller is wobbly on the shaft, replace the pump. Expect NZ$120-$250 for the part, plus 1-1.5 hours labor.
- Control board not sending power to the pump: Rare but real. You’ll need a tech with a meter for a live test (safe isolation practices are non-negotiable). Board costs vary widely: NZ$200-$600.
- Crushed or internal hose blockage in the machine’s side channel: You’ll need to pull the dishwasher and open the side channel. Time-consuming but doable.
- Anti-flood triggered by a small internal leak: Find the leak source first (circulation pump seal, inlet hose, cracked tub on older units). Drain issues won’t clear until the base pan is dry and the leak is fixed.
Typical NZ costs (Wellington ballpark):
- Call-out/diagnostic: NZ$120-$180.
- Labor: NZ$90-$140 per hour.
- Drain pump: NZ$120-$250.
- Inlet valve: NZ$90-$180 (if you also have filling issues).
- Door seal: NZ$80-$160.
- Control board: NZ$200-$600.
When to repair vs replace: If the machine is under six to eight years old and the cabinet is sound, a pump replacement is nearly always worth it. If it’s 10+ years, has multiple faults (say, a noisy circulation pump and a corroded base), or the repair quote pushes past half the price of a decent replacement (NZ$500-$700+), consider replacing. Always check your warranty and your rights under the Consumer Guarantees Act-if a relatively new dishwasher has a major failure, you may be entitled to a remedy beyond the basic warranty.
DishDrawer specifics (Fisher & Paykel):
- Each drawer has its own filter and pump; check both if either drawer misbehaves.
- If F1 appears, the base tray has water. Unplug, pull the drawers, dry the tray, and find the source before restarting. Don’t force a reset; you’ll risk an electrical short.
- Drain hoses can kink behind the chassis during install-especially if cabinetry is tight. Pull it out and re-route with a generous loop.
Decision tree you can follow without overthinking:
- Standing water? Yes. Clean filter and sump → Test drain.
- Still full or slow? Disconnect hose at sink into bucket → Run drain.
- Strong flow into bucket? Sink trap/air gap blocked → Clear and test.
- No/weak flow into bucket? Check hose for kinks/clogs → Flush/replace.
- Hose is clear? Inspect pump for jam; free impeller → Test.
- Impeller free but no action? Test pump continuity → Replace if open.
- Pump tests fine but still no drain? Check base pan for water → Fix leak; reset float.
- Still stuck? Likely control/power issue → Call a tech.
Pro tips I’ve learned the hard way around Wellington:
- After kitchen renos, I find missing high loops and unremoved disposal knockouts more than anything else. If the problem started right after a plumber visit, check those first.
- Families with lots of seeds (kiwifruit, pumpkin) should tap the filter weekly. Those tiny seeds mimic sand in the sump and love to jam impellers.
- Pods are fine, but if you see foam during a wash, switch to powder for a few runs and use less. Suds can trick sensors and rob pumps of head pressure.
If you rent: report the fault promptly, describe symptoms (standing water, error code), and note what you tried. Don’t remove panels if your tenancy agreement forbids it. Landlords in NZ are usually fine with filter cleaning but prefer a tech for electrical parts.
If you’re time-poor: bail the water, clean the filter/sump, check the hose at the sink, then stop. Those three steps solve most cases. If it still fails, book a pro with your model number ready (find it on the door frame) and mention any error codes you saw. That usually saves a revisit.
One last maintenance routine that pays off: set a calendar reminder. First of every month, five minutes: filter out, rinse, sump wipe, spin spray arms, door seal wipe. That habit alone slashes the chance of a midweek puddle and keeps your dishwasher smelling like, well, nothing.